Thursday, September 18, 2014

Angelic White Nail Mask (Review)

Hello Everyone!

I know, it has been WAYYYY too long since I last blogged. I do apologise for that.
However, I am very glad that to see people emailing me regarding about the products that I have reviewed! It is a good news for me.

We all have neglect our nails. I am not talking about going to pedicure and have your gel polish on.

Our nails are exposed to many trauma and pollution daily. And I believe most girls will type on the keyboard with their nails, and all the filing from the gel session, shampooing your hair, removing nail polish with alcohol, etc...  are actually harmful to our nails!

I was busy working for these past months, and recently, I got the chance to review this amazing nail mask!

Yes, you didn't got it wrong, We have masks for our hair, body, feet, hands and face, so now, there's a nail mask!

Angelic White Nail Mask is a product from Canada.
It helps to strengthen and cure dry brittle nails!

Once in a while, I do let my nails breathe. And I was a former nail-bitter, hence my nails are very very soft. Forcing me to shorten the 'bare' nails period and apply polish every now and then.


Angelic White Nail Mask


It comes with 3 bottles of goodness.

Green Tea + Avocado Booster Vitamin 10ml
It has the natural combination of both Green Tea & Avocado oil which is a rich source of Vitamin A & E! The Avocado oil will enhance the penetration and absorption of other nutrients. With the help of Green Tea, a super potent antioxidant, it will aids in healing and restoration of the damage your nails have. There's also Jojoba oil that smoothes and improves the elasticity of the cuticle and their ability to retain moisture in the nails. Upon opening the bottle, a scent of lemon that is from the Lemon oil for Vitamin C and whitening. It can be used as a cuticle oil too!

Honey Oat Nail Mask 10ml
This unique and natural nail mask contains oatmeal and honey, which are very effective as a cleanser, exfoliant and moisturizer. There are 18 amino acids in oatmeal! Which are essential for healthy nails. :)
The amino acids act as a building blocks to replenish nail keratin tissue, promoting healing for dry and damaged nails.

Keratin Essence 30ml
This light a refreshing essence contains keratin and collagen which are the key protein for structural building block for nails and cuticle area.When the outer layer of keratin becomes damaged, it affects the new cells that are no longer being protected beneath it. This caused dry and brittle nails. Keratin is also used to smooth and fill in the damaged nail layers.

There are 3 steps in using them;

Firstly, apply the Green Tea + Avocado Booster on your nails and massage.


Do not wipe dry! 


Proceed to apply an even coat of the Honey Oat Nail Mask on each nail. Leave it on for 10 mins or until it turns transparent!
* It dries quite quickly


After that, spray the Keratin Essence on each nail. The treatment will turn white. You can either spray and peel 1 nail at a time, or spray all fingers at once :)


Wait for about 2 minutes and you can wipe them off with a cotton pad or enjoy peeling the mask off with a tweezers!!


Incredible isn't it?! Haha! And it is so fun too!

This are my before/after nails, and I can feel that my nails are smoother, and some of my yellow stains are lighter!

As a test, I've decided to use it every alternate 2 days. And this is my result after 2 mask session.

BEFORE (27/8/14) 


AFTER (29/8/14) 

My nails are definitely whiter!!
I AM SO IMPRESSED! My cuticles are more moisturized now and the yellow stains are fader! :)

Perhaps I could really bid goodbye to my sad and brittle nails!!

Of course the results may vary according to different people's nails' condition.
But it certainly works for me!

Apparently you can use them on your toe nails, and oh my god, toe nails are the most neglected part, I believe.

All 3 items are sold as a set!
If you're interested in getting them, please contact J&P Holdings at 6883 2422 for more information on Angelic White Nail Mask.


Sunday, June 9, 2013

Chanel vs OPI, French Tip Possible, You Can Leopard Too!

Hello Everyone!

Alright, yes, I am super guilty again for forsaken this space. But hey, I was too occupied for the past few months!

Love my new blog banner? I did it myself & I love it wayyyy tooo much... :D (please pardon my self-praising) Thank you Deviantart artists for the lovely drawings

This is a new beginning y'all. I promise I'm gonna update as much as possible in this little comfort space of mine. (:

___________________________________________________________________

• Chanel vs OPI •

Often, people asked me, "Miranda, is Chanel's Nail polish that good?"

Oh well, WHAT DO YOU THINK? Haha! Of course it is good!
Retailing at SGD36 per bottle, it needs to be good man.

For this entry, I'm comparing Chanel's Dragon & OPI's Color So Hot It Berns.
(I'm sorry for my ugly & dry cuticles, haha, I'll do something to it soon)

OPI - Color So Hot It Berns

For OPI, most of their colors are not that bad. As you can see from the picture above, I've applied 1 coat and it is still quite translucent. But it will definitely bring out the red upon the 2nd coat. This shade of OPI is of a brighter red, chili red I would say.


Chanel - Dragon

Woohoo! Check this out. Chanel is Chanel right? I mean, just look at it. 1 coat and it is almost done! 
It really depends on the age of your polish as well as the application method. 
I rarely use my Chanel - Dragon for Nail Art. It defeats the purpose of 'showing off' Dragon's glamour. 

If you are still skeptical on whether to invest on Chanel's polishes, don't be shy, go down to their cosmetic counter to try it out! :D

I only purchase Chanel when the shade is unique to them only. For example, their classic red is a must-have, and the next bottle I've purchased was Peridot. A mysterious shade of gold & purple.

__________________________________________________________________

• French Tip Possible •


Normally, people would just use scotch tape to do their french tip. But the current trend now is to leave
the 'pink' part of your nail bare and pair up with a colored tip!


Reference photo from : http://bestnailartdesigns.com


Let me show you how you can do it too! :)


First and foremost, french tip only looks nice when you have a free edge. By that, I mean you need to have the 'white' part of your nail. (shown via the arrow)


Your natural nail has a curvature. Therefore you can use the curve as a guideline for your french tip.

If you were to use a scotch tape, there won't be any curve, but a huge solid line which is pretty ugly in my opinion. Or, you could buy french tip stickers, but those are either useless, too sticky or expensive. Your choice.

So the first step is to start from the side you are comfortable with. For me, I like to start on the left, then sweep to my right. And then vice versa.


 For the first timers, you will normally get an awkward arrow shape. But that's ok! Load your brush with a little polish and follow your free edge line. And you'll probably get something like this.


Look, mine isn't that perfect either. hahhahaah * embarrassed* 

Not that hard isn't it?

After this you could just apply a layer of top coat and you're done! If you are more adventurous, you could add some details to the separation line with some blings or a black line. (:

Practice makes perfection!

___________________________________________________________________________

• You Can Leopard Too! •


No, it is not a nail polish name. haha~

Leopard prints is one of the first nail art that I've tried 2 years ago before I got addicted to nail art.

It is super easy to do!

Things you would need are: 2 contrast nail polish colors, black nail color, toothpick/nailart brush/dotting tool.


First, apply the base color of your choice. Make sure that it is absolutely dry before working on it!

Next, use the other contrast color and dap it randomly around your nail. This would be the major 'spots' of the print.


I know this is probably an Art Attack moment. 
Just use the tool of your choice (toothpick/nailart brush/dotting tool) and black nail polish, draw on the random spots!

Make a perimeter along the major spots, but DO NOT MAKE A FULL CIRCLE. haha! It will look damn weird.


Leopard print is one of the most common nail art that we can see nowadays. Give it a try!
And most importantly have fun! :D
________________________________________________________________________


I would like to thank some readers of mine that emailed me to say that they appreciate & like my entries. Thank you! I'm super guilty that I don't regularly update. :(

But I am gonna do so now!

I would like to thank my friends as well, to those who read this space. Thank you so much!
It really gives me motivation to explore more about nail polish & share with everyone!

I'll end this post with my current nail art that I did 2 days ago!


Bring out those flowers, it's Summer!
Inspired by fuckyeahprettynails.tumblr


Till next time,
Miranda ~

Friday, January 18, 2013

How to apply a smooth coat of polish

Hi everyone!

I am super ashamed that I've left this blog to rot for half a year! D:  Was busy and all with school and travel, but hey! I am back! :D

Let me start off where I had stopped in June 2012...

Well, most of us do not have that amount of time to book an appointment with the manicurist for a session. Thus, we need to DIY yeah? So, how to apply a smooth coat of polish just like those manicurists?

I have been to adequate amount of visits to the salons and I always watch how they do it. And, I went home and tried it myself, IT WORKED!!!!

Firstly, ensure that your nail polish isn't clumpy(duh, if not it won't be smooth). If it is clumpy, try using a lacquer thinner to solve it. Next, ensure that your nail is smooth! With all those ridges on your cuticle it is not helping in achieving a smooth coat trust me. It is because when you apply polish on your nail, the polish will flow according to the curvature of your nail, so it is important to regularly buff your nails to ensure that!

Enough with the saying and let's get started!


****Always ensure that the polish on your brush is at the 1/4 end.****


One of the common mistake that we made is loading a huge amount of polish (picture below) on the brush. This will cause overloading and while you apply, the air will get contact with the polish and hence dry faster, giving you a clumpy, sticky finish. 


So once you load your brush, apply the middle portion of your nail.


Follow by one of the side...


And the other side.... At this stage, you could clearly see that there are overlapping on the nail, but it is okay! The application of the 2nd layer will solve the problem.


Apply the middle portion again...


Follow by the side (Note: the first side that you applied initially)


And finish up with the other side...


There go you! A perfect polished nail!


It may take awhile to get the hang of it. But that is normally how I apply my nails and it really gives a
smooth coat!

Another thing I may want to add is that, usually people would shake the nail bottle before using.
But do you know it is actually bad for your polish? By shaking, you introduce air into the bottle, which causes bubbles to form. Especially to base coats and top coats (why would you shake them?).

ROLL THEM. Yes, roll them between your hands as if you are kneading a long strip of dough.

In addition, when you are loading polish to the brush, do not pump your brush into the bottle too many times! By the mascara law, you are pumping air into the bottle as well.


When I was in Seoul in December, I found this amazing thing in FaceShop!!  Nail Dry Cover!!
It is like one of the best invention for nail art ever!!!


 All you need to do is to put these on after you apply your nails! It prevents them from 'accidents'.


See! I could even use the thing to scratch my head. AWESOME!!


I have been sourcing ways to make nail art a more enjoyable hobby! I hope that you have learnt a thing or two from this post!!!

:D


Sunday, June 24, 2012

Cheap Nail Polish that Works!

I bet that many girls would purchase a variety of nail polish brands in order to suit their wallets appetite...

In my opinion, one does not need to have an expensive nail polish to achieve a good quality manicure!

Let me introduce to you 1 brand that I love whose Nail Polishes only cost SGD2 per bottle!


Rainbow by City Girl, is a local brand, I think. You can find them in Aries, Chameleon, or any hair accessories shop in the market or shopping centres.

Let me show you their quality...


This is one coat of the Shimmer Blue. And after 2 coats of it...


It became super opaque! I love the red because it is Fast Dry and Easy to apply! Did you see that there are no stains or smudges around my cuticle? Because the brush is short and stout, therefore it is super easy to apply!


Sad to say that the colors are super limited, and often in pearl shimmers "Auntie" kind of color genre but hey! Treasures need to be hunt and dug. :D

I often use such cheap nail polishes to do nail art, so if there is any mistakes which I need to REDO the whole thing, I won't feel the pain for the wastage. Just imagine reusing and erasing your precious OPI, Chanel nail polishes for your stupid mistakes in your nail art... (T__T)

Currently I have 5 bottles and I also used their transparent polish as Top Coat! :D 

______________________________________________________________________


Next up, Chunky Glitter.

I know that there are many brands that have pretty awesome chunky glitter. But it normally would cost $10 - $30 per bottle.


These 'UNKNOWN' Brand glitters caught my attention. It is only SGD2 per bottle!!!

They have the same effect as their expensive counterparts I SWEAR!

Okay, I have a bottle of OPI Rainbow Connection. It is a pretty concoction of Muppet's Theme Glitter.
I am going to compare it with the 'SHENGJI FASHION COLOR" Glitter.


Note that they are both Chunky Glitter Nail Polish with a slight tint of green as their nail polish base.


I am super sorry for the blur picture but as you can see, there is no difference in the quality! Other than the color differences, both of the chunky glitter looks pretty to me!
(My pink base is OPI Strawberry Margarita)

But there is a thing to note when you buy cheap nail polishes. And that is, it is easily clumped up.
In other words, easily dry and spoil. 

When such situations happened, all you need is a handy nail polish saver .......


NAIL POLISH THINNER!!

You can easily purchase this Enamel Thinner at Daiso for SGD2!  All you need to do is to add a few drops of it to your thickened nail polish, give it a good shake, and there you have it! Good as NEW! :D

It takes me anything to save money when it comes to such expensive hobby. Therefore, sourcing out for great bargains is a must!

I hope I've given you some tips to save your little pretty bottles at home (:


** NEXT POST : HOW TO APPLY A SMOOTH COAT OF POLISH!


Thursday, June 14, 2012

Introduction

Hi everyone!

This is a blog that caters specially (but not only to) Singaporean girls who didn't have much resources in the quality, types, and brands of nail polishes that are available locally!

As a Nail Polish addict, I do surf the web often, browsing various amazing nail polish review blogs, nail art blogs, nail art/polish tumblrs, etc. But, there isn't any that I could relate or to find information from locally!

Have you ever saw or came across a pretty nail polish blog and saw a shade/brand of nail polish that you like? And as you scroll along and found out that, DAMN! It is not available in Singapore.
Pretty bummed out isn't it?

Well, I had thousands of encounters with such issues and hence, I've decided to create my own blog!
I have supports from my family and friends who love my nail art and who are also *giggles* AMAZED by how many bottles of nail polish I have!

This is my current stash.


I separated my nail polishes into categories!

Those from the "Expensive Nail Polishes" are my O.P.I , Orly, China Glaze, Anna Sui, Chanel, NARS, ZOYA and Sephora Polishes.

The "Favourite Lower Grade" are mostly BRANDLESS, meaning they do not have a reputable brand, or just imitations of the exquisite brands and my L.A. Girl stash.

"Cheap Nail Polishes" comprises of nail polishes that cost not more than SGD3 per bottle! Some brands are like 'The Face Shop', 'Rainbow', 'Aries', etc. I would only use polishes from these stash when I want to do extreme nail-art painting.

There is a need to categorize your bottles, especially if you have a huge collection like mine. It will be easier to find, replace, replenish. I do not sort them out by colors because I do not have much space for that (I will definitely do it if I have a proper rack).

My plastic rack can be bought in any provision shops, and the blue tray and transparent box are from Daiso at SGD2 each.

________________________________________________________________

Most of my nail polishes are found in Singapore. Let me present to you you my pride & honor collection... ...

**Note: I do not have all the colors of the rainbow, as I do pick out colors that I love (: 


1. O.P.I. Nail Polish

I do understand that many of you have at least a bottle of O.P.I bottles at home. With all the mega sprees, flea markets, and toyoutpost cube shops, it is hard to resist such beauties in a classy bottle.

However, please do note that there are many despicable shops around selling FAKE O.P.I. Always remember to look at the bottom seal for the Name/Code/Ingredient List/etc.

I had my first bottle of O.P.I in 2005? It was a gift to my elder sis, but somehow she gave it to me instead. That is when I was like, "Wow! The quality of the polish is amazing!"

Subsequently, I have many other bottles of it. :P


I love O.P.I for their creativity in the naming of the colors. I am always excited to see the upcoming color collections. But as time goes, I realized that the quality of O.P.I is dropping. It is less opaque and needs numerous application for a full coverage. :(  not good. But, I am still going to keep a lookout on their collections!


2. China Glaze

China Glaze only came as a hit to the shores of Singapore in recent years. I rarely/do not see China Glaze polishes in the retail shops. It is considered a rarity and you could buy it only at certain cosmetic shops that imported them over.

However, now you could purchase them online, in flea markets, or at Sephora(SGD 15).


This is my puny stash of China Glazes. I love how it is easy to apply! All I need is just 2 coats for a total coverage. My favorite color is For Audrey (2nd from the right), it is a Tiffany blue shade.

I will definitely stock up more China Glaze nail polishes! :)
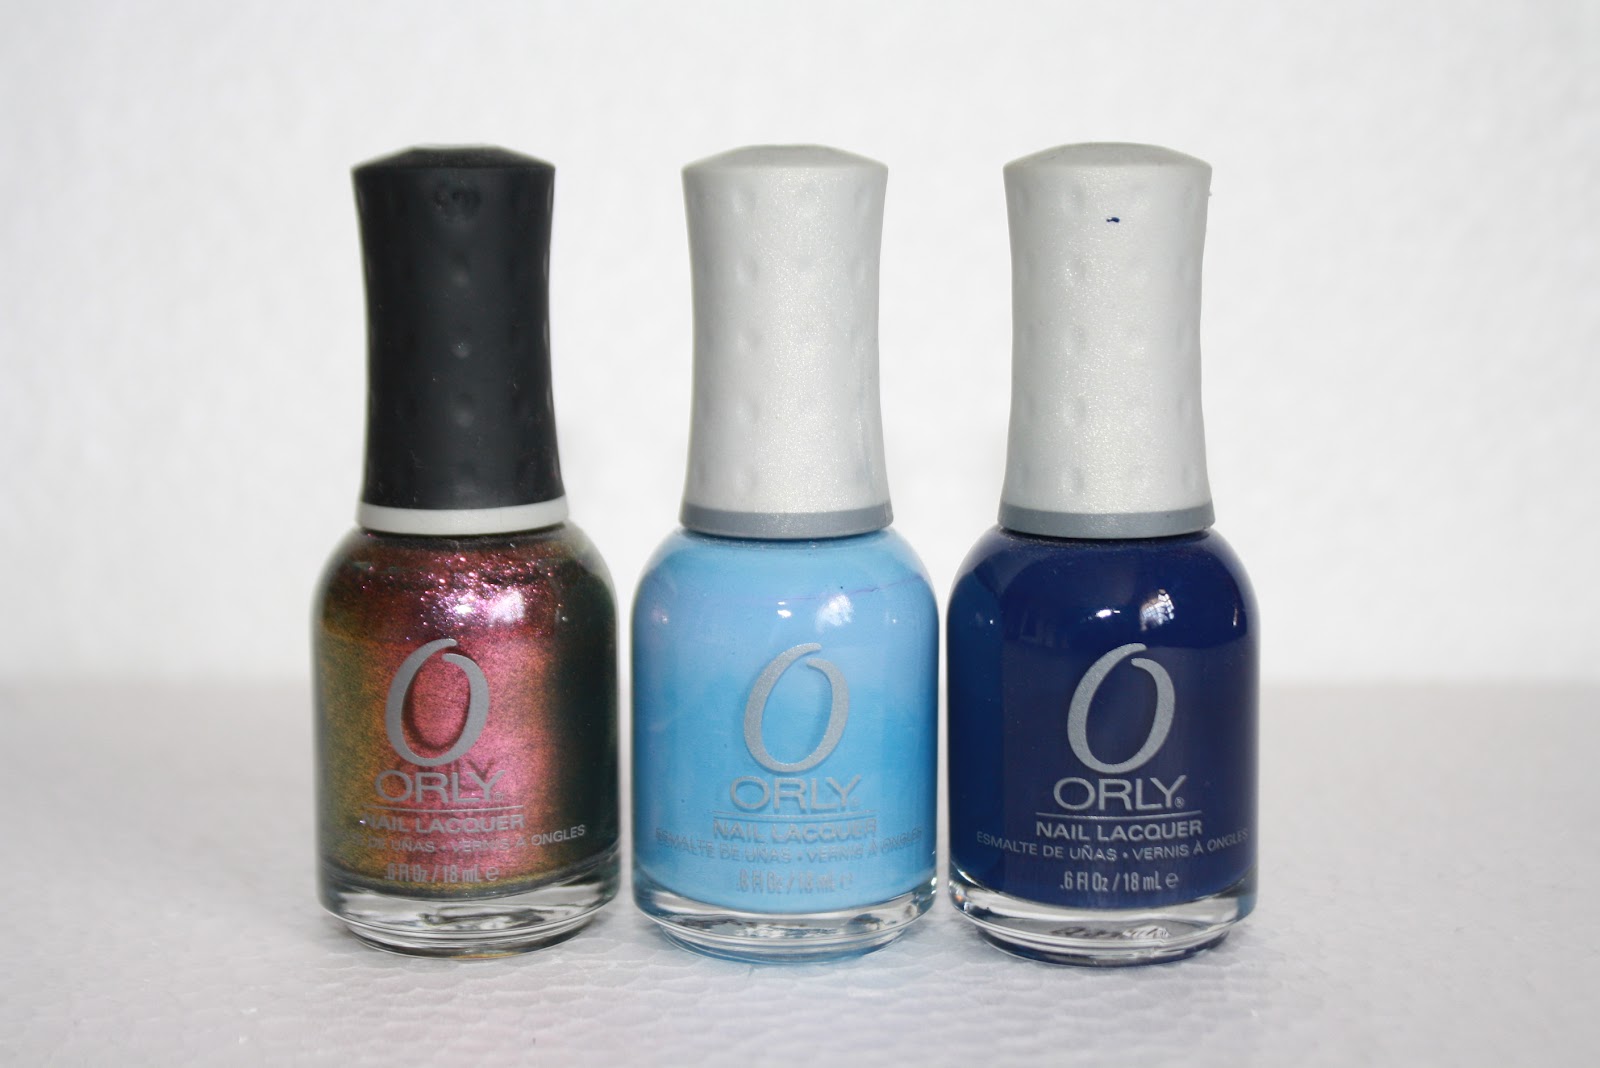

3. ORLY


ORLY nail polishes are super rare in Singapore. But damn, they are good, especially in their recent collections of the interesting colors. The quality of ORLY is reputable as they are super opaque with 1 application!

You can find ORLY colors in selected toy outpost stores, flea markets, and cosmetic stores located at Far East Plaza Level 4 or Bugis Village Level 2.


My favourite color of ORLY is none other than Space Cadet (1st on the left) of the Cosmic FX Collection. Shimmers in Green, Magenta and Gold. AWESOME! I wish that there are more updated collection of ORLY nail polishes in Singapore :(


4. Chanel

Yes, I know, Chanel. Mad expensive at SGD36 per bottle. But it is so pretty and nice and ooooooOO~!

I pampered myself with my first bottle of Chanel nail polish in 2011. Bought the classic RED color, DRAGON. I was super amazed on how just by 1 application, the color was so vivid hence there was no need for a second layer (unless you are anal about layers)!!
Despite the small & thin brush, I could cover my whole nail in just 2 strokes.


After Dragon, I was so O_O on the new color, Peridot. The color is like melted Nickel metal! Damn pretty! Same as the Dragon, all I need was 1 application and my nails are covered in pretty Peridot!
Gold Fingers was given to me as a birthday present by my friends. It is a slight translucent gold shimmer!

I will only buy Chanel Nail polishes when the color is exclusive to theirs. Meaning that I will not find it on other brands.

** I'm so angry that OPI and Sephora had recently launch a color similar to Peridot. How could they?!


5. NARS, ETUDE HOUSE, ZOYA, ANNA SUI

I frequent nail blogs a lot, that is when I knew about the cosmetic brand, NARS. I bought my NARS nail polish in Taiwan, Taipei. The bottle is similar to Chanel, but instead of a separate cap, it was a whole brush cap.
The shimmery metal Purple Rain caught my eye! It cost SGD31, worth it as you can't find NARS cosmetics in Singapore :P

I bought this Shimmer Blue (BL009) from Taipei's Etude House. It cost SGD10. It is under their Dear Darling Nails Bling Bling Series. I can't find it in Singapore when I was back, therefore I assumed it is an exclusive collection to Taiwan!


I bought my ZOYA Gemma online. Was in love with its unique Olive Green color.

Anna Sui is another splurge but not an impulsive buy! It cost at SGD33 per bottle. All Anna Sui's nail polishes will have the Signature Rose Scent. And the shimmer green was opaque after 2 application! Super rare for shimmer nail polishes!


6. Sephora & L.A. Girl

Sephora is a new cosmetic mega store in Singapore. I was quite surprised that they have their own collection of nail polishes! I've received gift vouchers for my birthday, so I've decided to put a good use to it!


These 4 bottles caught my eye among the major array of colors available. Pastel Purple, Lime Green, Cement Grey and Curacao Blue. It has a wide brush, and thick polish which will give an opaque color with just 1 application. Price at SGD9 per bottle.


L.A. Girl used to be my favourite brand of unique nail polish color, till I found ORLY. haha.
I almost had at least 1 bottle from each collection.


I withdrawn my craze for L.A. Girl due to that the quality of their nail polish will drop after certain time. :(  My favourite was the MATTE Series, it was AMAZING! It gives a leathery matte texture.

Rock Star Series was all glitter, METAL was all shimmers, Black Light DISCO Brites had glow-under-UV-light polishes which I have yet to tried it out and Glitter Addict with all the chunky glitters, mine was BLACK, extremely unique black glitter which is hard to find!

7. Sally Hansen

I am not a Sally Hansen fan because I dislike their long and thin brush. It is very hard to achieve a smooth surface with it as it dries up easily. And then, they launched their huge wide brush series (right) which is TOO BIG -_- that it creates smudges around the cuticles, which meant messy clean up after application.


Therefore, I only have 2 bottles of Sally Hansen. In addition, their price are not worth it in comparison to their quality.You could find them at Watsons or Guardians.

But I love their Nail Care Collection, because it really works! I would rather much purchase from their Nail Care Series rather than their Nail Polish Collection.


___________________________________________________________________


And there you have it. Some of the common nail polish brands that you are able to find in Singapore. 

I know I have left out a few of them, but these are the ones that I have! My collection is growing, and I'm loving every single bottle of it. 

Time after time, I will throw away old, sedimented bottles that are spoilt and un-usable. 
(( Please remember do not store your nail polishes at places with direct sunlight!! ))

I hope my first review post gave some insights to you on the products (: and perhaps clarify your doubts before your purchase! I will do an in depth post on each brand with pictures and comparisons!

Thank you for reading this little space of mine. 

Please look out for the next post on: "CHEAP NAIL POLISHES THAT WORKS!

xoxo, Miranda